


Super Insulation: Your Energy Hero
Super-insulated homes can be heated with a hair dryer, even in Maine's climate.

Heating a well-designed new home with a gas-burning furnace or boiler is like lighting birthday candles with a flamethrower. That might seem a little extreme, but consider the fact that a 2,000-square-foot new home built to Passive House standards in climate zone 6 (northern New England and the upper Midwest) has a peak heat load of less than 2,000 watts. You can buy electric hair dryers that use that much power.

Insulation (starting with air sealing) is the key to achieving high levels of home energy performance. Older, poorly designed homes with inadequate insulation require fifteen times more power to heat. A homeowner might use an online boiler size calculator to ask, “What size boiler do I need for a 2,000-square-foot home in climate zone 6?” A typical answer would be a gas-burning boiler rated at 100,000 to 120,000 British Thermal Units per hour (29,307 to 35,168 watts).
A high-performance home (built to Passive House standards) gets 30 minutes of comfort per kilowatt hour of energy used to heat it on the coldest day of the year. A 48 kWh home battery system (four Tesla Powerwalls) can keep a well-insulated house anywhere in the United States toasty all day—or several days using a high-performance heat pump. A low-performance home that needs a 100,000 BTU/hr furnace gets only two minutes of comfort per kWh. A 48 kWh battery system could keep a low-performance house warm for less than half an hour.
In older homes, we can take many steps to improve insulation, increasing our home’s energy parsimony well above two minutes of comfort per kWh:
Air seal between an attached garage and the rest of the house.
Seal air leaks in the basement and attic.
Check weatherstripping around windows and doors; repair or replace as needed.
Close dampers in wood stoves.
If we have fireplaces, put in chimney pillows when we don’t have a fire.
Install interior storm windows in drafty old windows.
Seal around pipes, wires, and ducts.
Check for insulation in walls and attics; add more if necessary.
Add insulation during renovation projects.
Put down vapor barriers and insulate basement walls and crawl spaces.
Weekly Poll: How Many Hair Dryers?
Help! I can use a caulk gun, but I don’t know where to start air-sealing my home.
Air sealing means using materials like drywall, plastic film, house wrap, foam, caulk, and weather stripping to prevent air from infiltrating (coming into) and exfiltrating (going out of) your home. Houses do not “need to breathe” through their walls and attics. Houses should breathe through controlled ventilation systems.
Air sealing a house without controlled ventilation may trap moisture in your walls and ceilings. That can lead to mold, mildew, and unhealthy indoor air quality. With controlled ventilation, air sealing ensures your home’s relative humidity stays in the healthy range of 40 to 60 percent all year.
Here are three tips to keep you out of trouble on any air-sealing project:
Best practice is to replace all fuel-burning systems with electric ones. If you burn fuel in your home, you risk carbon monoxide poisoning. Even sealed combustion appliances can leak; the safest option is not to burn fuel. The nice thing about getting rid of a gas-burning water heater or furnace is that not only are heat pumps safer and able to use solar electricity, but also much more efficient.
Check that kitchen hoods and bathroom fans continue to draw well after any air-sealing project. An easy test is to put a bit of toilet paper next to a bathroom fan. When the fan is running, the toilet paper should stick to it. If your fans are not able to draw well, then you’ll need a balanced recovery ventilation system.
Air seal before insulating. Spray foam is air sealing and insulating combined, but cellulose, Rockwool, or fiberglass require air sealing to be effective.
If you have an attached garage and drive fuel-burning vehicles or use fuel-burning equipment that you store in your garage, the most important place to start air sealing is between your garage and the rest of your home. But before you start any air sealing at all, install carbon monoxide detectors in every bedroom and on every floor of your home.
You risk your health if you park fuel-burning vehicles in an attached garage or operate any fuel-burning equipment or appliances in your home. Until you can upgrade to electric vehicles, appliances, and heating systems, a carbon monoxide detector can alert you if you are breathing dangerous fumes from any of these sources in your home.
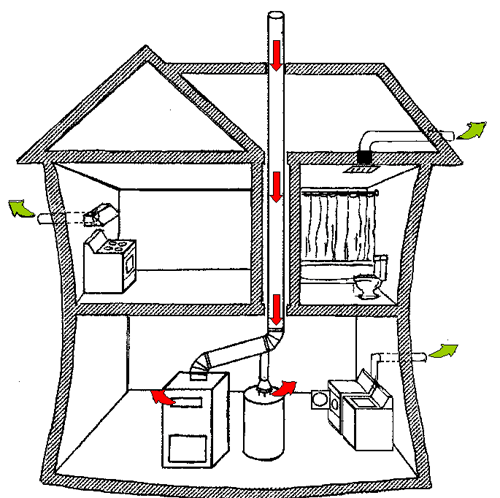
After air sealing between your attached garage and the rest of your home, the next place to tackle is the basement and then your attic. The “stack effect” explains why cold air moves faster the lower it is, and warm air moves faster the higher it is, making your basement and attic the primary route for air moving through your home.

When it’s cold outside, the pressure created by the stack effect is 4 pascals per story of height; when it’s hot, about 1.5 pascals per story of height. If the stack effect is a big deal in two-story houses, imagine what kind of pressure it causes in high-rise buildings. This pressure is so significant in fact that “when skyscrapers were first developed at the turn of the century, people also had to invent revolving doors because you couldn’t open the front door due to the stack effect pressure,” says [TLJ Engineering]. “The cold air was rushing in with so much pressure that it was difficult to push the exit doors open.”
—Understanding the Stack Effect, Green Building Advisor
Mitigate any moisture in your basement before you start air-sealing your attic. Air naturally moves from your basement up into your house and then into your attic, bringing moisture with it. Unless you have a plumbing leak, all the moisture in your basement comes from outside your house. Opening basement windows just brings in more water; air sealing your basement keeps airborne moisture out of your home.
Here’s a checklist for air-sealing a basement:
Make sure all windows close and seal tightly. Use window foam (not regular expansion foam) to fill the gaps around every window frame. Remove trim boards to get access to the window frame. Sometimes, contractors put no insulation at all or stuff fiberglass insulation around a window opening. Pull out fiberglass insulation and replace it with window foam to create a tight air seal.
Check if your home has a sill seal. If not, caulk or foam between the mudsill (also called a “sill plate”) and foundation.
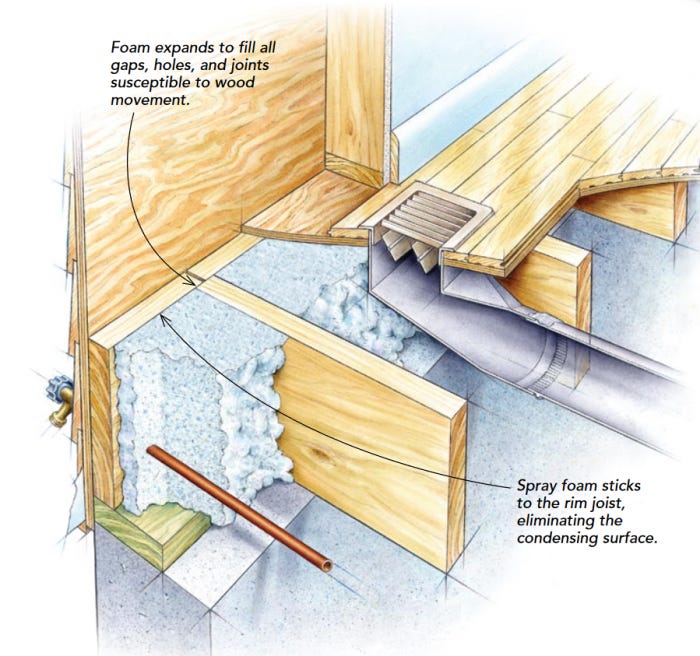
Spray foam at least three inches on your rim joists (also called “band joists”). In older construction, the rim joists are uninsulated—air can often leak around these boards to get into your basement, and heat only has to travel through a few inches of wood to leave. Spray foam prevents air flow, heat flow, and condensation.
After you’ve taken care of moisture and air sealing in your basement, air seal your attic. If your attic contains living space, check and tighten up windows just like you did in your basement. If your attic is not heated, the goal is to stop all airflow into your attic from anywhere in your house. Here’s a checklist:
Make sure no air can flow up inside walls. A top plate should be installed on every wall, i.e. from your attic you should not be able to see down inside any wall. You may want to hire a professional company to do the air sealing if you can see large gaps that open up into the bays between studs in your exterior walls.
Make sure no air can flow up around vent pipes, ducting, wiring, etc. You can use foam or caulk to seal most openings, but gaps around chimneys require special heat-resistant materials.
Install weatherstripping around any attic hatches or doors and a system that allows you to pull the attic access door tight and latch it.
If you have any recessed lights that poke up into your attic, replace them with “canless” or “ultra-thin” LED lights. Foam or caulk in place a recessed light cover over the hole in your ceiling.
After your garage, basement, and attic, seal leaks in exterior walls and around exterior windows and doors.
Help! Are my wood stove and fireplace letting all the warm air out of my house when I’m not using them?
Yes they are, unless you close the damper tightly or use a chimney pillow.

Help! How do I know if I have enough insulation in my house?
How long do you want your house to last? If you would like to have a sustainable home that can provide shelter and comfort for many generations, the Passive House standard of a peak heating load of 10 watts per square meter is a good target.
Use a heat loss calculator to determine what levels of air sealing and insulation are required to meet that target in your climate. Chances are, with an existing home, you’ll be unable to achieve the Passive House standard. Just do the best you can with an old house until you’re in a position to rebuild it.
Help! Should I insulate the walls or ceiling of my basement?
To save energy, insulate just the walls of your basement from the outside and not the ceiling or floor of your basement.

What’s Still Ahead on the Pathway…
Earlier this year, we explored the pathway to sustainable movement; now, we’re exploring the related pathway to sustainable energy. What are the best ways to save, use, and make energy? Stay with us on the journey to sustainability as we take action to have a positive impact on the world.
References and Further Reading
Passive House requirements, Passive House Institute
IECC climate zone map, US Department of Energy Office of Energy Efficiency & Renewable Energy
The Best Hair Dryer, The New York Times
Air Sealing, Efficiency Maine
Boiler Size Calculator: What Size Boiler Do I Need?, PickHvac Cooling & Heating Guide
Powerwall, Tesla
First Steps to Endless Energy, Fred Horch
Tyvek (registered trademark) HomeWrap (registered trademark), Dupont
Better Indoor Air Quality, Less Wasted Energy, Fred Horch
40to60RH.com The Healthy Humidity, Stephanie Taylor
Combustion Gases in Your Home – Things You Should Know About Combustion Spillage, Government of Canada Natural Resources Canada
7 Things to Know About Rockwool Insulation Before Installing It in Your Home, bob vila
What about carbon monoxide detectors?, US Environmental Protection Agency
What Is The Stack Effect?, neeeco
Stack Effect Or Chimney Effect, TLJ Engineering
Understanding the Stack Effect, Green Building Advisor
Wet Basement Solutions: How to Stop the Leaks From Coming, This Old House
What is Window Insulation Foam? (Types/Manufacturers/Cost), Retrofoam of Michigan
The Dos and Don’ts of Using Expanding Foam Insulation Around the House, bob vila
Insulating Rim Joists, Green Building Advisor
How to Install Low-Profile LED Lights in Your Kitchen, Family Handyman
TENMAT (registered trademark) Recessed Light Cover, Energy Efficiency Solutions
Chimney Balloon | Draft Stopper, Rockford Chimney Supply
Seal an Unused Fireplace, Fine Homebuilding
Heat Loss Calculator, Castrads
A home energy audit by a professional Energy Advisor is the most effective way to identify opportunities for energy efficiency improvements in a home. There are also incentives available to help with the cost of the upgrades, including air sealing, insulation, windows, doors, heat pumps and solar PV systems: https://www.ecologicenergyadvisors.com/